
1. Introduction
Bicycle helmet strap replacement is an important part of keeping your helmet safe, secure, and comfortable during every ride. Over time, straps can wear out, stretch, or break, reducing their ability to keep the helmet in place when you need it most. A faulty bike helmet buckle, frayed webbing, or an uncomfortable fit are all signs it’s time for a replacement. Whether you’re upgrading to a helmet strap quick release buckle kit or performing a basic repair, knowing how and when to replace these components can greatly improve your helmet’s performance. This guide will walk you through everything you need to know to replace your helmet strap correctly and confidently.
Table of Contents
2. When and Why You Should Replace Your Helmet Strap
- If your helmet feels unstable or shifts while riding, it’s a sign you need to understand how to fix a loose helmet strap or replace it entirely.
- Over time, weather exposure and daily use can wear down strap materials, making it important to know when to replace a bike helmet strap for continued safety.
- If your helmet buckle is not working properly or fails to lock securely, it compromises protection and calls for a full strap or buckle replacement.
- Any visible signs like fraying, stretching, or twisting in the strap webbing are red flags—these issues are often beyond basic bike helmet strap repair tips.
- After a crash or even a minor impact, inspect the straps closely and learn how to check helmet strap condition, as damage may not always be visible.
- Replacing your strap with a new one or upgrading to a helmet strap quick release buckle kit can restore proper fit and ease of use for everyday cyclists.
- Riders using helmets for commuting or off-road biking should regularly check strap tension and condition to avoid unexpected failures during rides.
3. Understanding Helmet Strap Parts
- The helmet strap system consists of several components that work together to keep the helmet securely in place during a ride.
- The main strap webbing runs from each side of the helmet and is typically made of durable nylon to withstand tension and wear.
- The bike helmet buckle is the locking mechanism under the chin that ensures the helmet stays fastened; it should click securely without slipping.
- Strap adjusters or sliders allow you to fine-tune the fit by tightening or loosening the webbing, helping to reduce movement while cycling.
- Some replacement kits include a helmet strap quick release buckle, which offers faster fastening and is ideal for commuting or frequent use.
- The Y-splitter is the point where the strap splits near the ears, and it must be correctly positioned to ensure the helmet sits properly on the head.
- Understanding these parts is essential for anyone learning about bicycle helmet strap replacement or considering an upgrade for comfort or convenience.
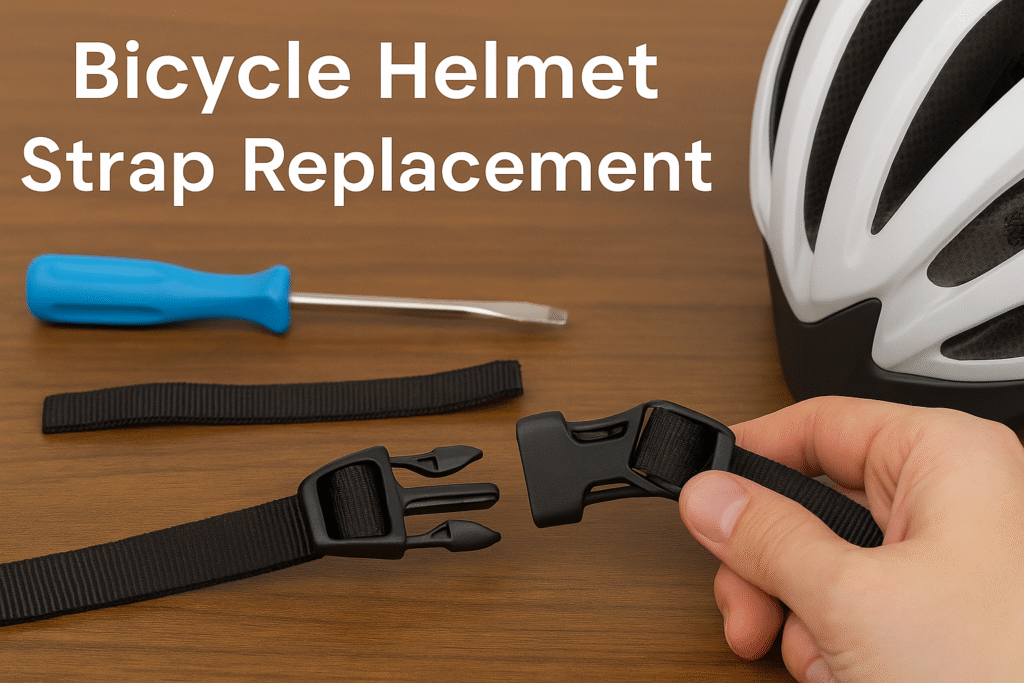
4. Tools and Materials You’ll Need
- A replacement helmet strap or a complete helmet strap quick release buckle kit that matches your helmet’s design and width
- A small screwdriver or needle-nose pliers to remove and reattach buckles or clips during the bicycle helmet strap replacement process
- Sharp scissors to cut frayed or damaged straps cleanly before installing the new one
- A lighter or heat source to seal the cut edges of nylon straps and prevent unraveling
- Mild soap and a soft cloth to clean strap slots and helmet surfaces before reinstallation
- A tape measure to ensure the new strap matches the length and fit of the original setup
- Optional: replacement bike helmet buckle in case the existing one is cracked or no longer locks securely
- Instructions provided by the helmet brand or kit manufacturer to ensure safe and accurate installation steps
5. Step-by-Step Guide: Bicycle Helmet Strap Replacement
a. Remove the Old Strap
- Unclip or unscrew the existing strap, depending on your helmet’s fastening system.
- Gently pull the strap out of the shell slots without damaging the helmet structure.
- Check the strap path so you can mirror it when installing the new one, especially with a bike helmet buckle or branded components.
b. Prepare the New Strap
- Thread the new strap through the same slots, matching the original positioning for a balanced fit.
- If using a helmet strap quick release buckle kit, ensure all pieces are present and correctly oriented before assembly.
- Use a lighter to carefully seal the cut ends of nylon straps to avoid future fraying.
c. Install the Buckle
- Attach the new helmet buckle or reconnect the existing one, ensuring it clicks securely without slipping.
- If the strap kit includes a quick release, align the connectors properly so the latch engages smoothly.
- Confirm that all clips and adjustments are firmly in place before testing.
d. Test for Fit and Security
- Wear the helmet and position the straps to create a balanced “Y” configuration that rests comfortably beneath your ears.
- The bicycle helmet strap replacement should feel snug under your chin without being uncomfortable.
6. Tips for Choosing the Right Helmet Strap Replacement Kit
- Choose a strap kit that matches your helmet’s design, including strap width and buckle type, for a proper and secure fit.
- Look for a helmet strap quick release buckle kit if you prefer convenience and faster fastening during daily use.
- Ensure the replacement kit is compatible with your helmet brand or model to avoid fitment issues during installation.
- Opt for high-quality materials like durable nylon webbing and reinforced plastic buckles for long-lasting performance.
- If your bike helmet buckle frequently comes loose or fails to latch, consider upgrading to a stronger locking mechanism.
- For helmets with integrated features, such as built-in lights or mounts, verify that the strap kit won’t interfere with functionality.
- Read user reviews or manufacturer specs to check whether the kit is designed for bicycle helmet strap replacement or general helmet use.
- Choose kits that include adjustment sliders and complete instructions to ensure proper setup and safety compliance.
7. Common Mistakes to Avoid
- Using a strap that is not compatible with your helmet can result in a poor fit and reduced safety.
- Failing to thread the strap through the correct slots may cause the helmet to sit improperly or feel unstable during rides.
- Over-tightening or under-tightening the straps can lead to discomfort or ineffective protection in case of impact.
- Ignoring the condition of the bike helmet buckle can lead to failure during use—always replace damaged or worn buckles.
- Attempting bicycle helmet strap replacement without reviewing your helmet’s specific design may lead to installation errors.
- Choosing low-quality materials can result in quicker wear, reduced durability, and potential strap failure.
- Forgetting to test the fit and adjust the strap evenly after installation can compromise both comfort and safety.
- Replacing only part of the strap system instead of the full set may lead to imbalance or inconsistent tension.
8. Conclusion
Bicycle helmet strap replacement is a crucial part of maintaining your helmet’s safety and functionality. Whether you’re fixing a damaged strap, replacing a faulty bike helmet buckle, or upgrading to a more convenient helmet strap quick release buckle kit, ensuring a proper fit is essential for effective protection. This applies not only to cyclists but also to riders performing a motorcycle helmet strap replacement, where secure fastening is equally important. Regularly checking your helmet strap condition helps extend the lifespan of your gear and guarantees a stable fit during every ride. By following the right steps for strap replacement, you maintain the integrity of your helmet and stay safer on the road or trail.
9. FAQs
Q1: How do I know when it’s time to replace my bicycle helmet strap?
If the strap is frayed, stretched, uncomfortable, or the bike helmet buckle no longer clicks securely, it’s time for a replacement. Visible damage or difficulty adjusting the strap are also signs it should be replaced.
Q2: Can I replace the strap on any bicycle helmet?
Most helmets allow for bicycle helmet strap replacement, but compatibility depends on the brand and design. Always check the strap slot size and layout before purchasing a replacement or helmet strap quick release buckle kit.
Q3: Are helmet strap quick release kits safe to use?
Yes, a helmet strap quick release buckle kit can be both safe and convenient when properly installed. Just ensure the materials are durable and rated for cycling use.
Q4: What tools do I need to replace a helmet strap at home?
You typically need a replacement strap or buckle kit, scissors, pliers or a screwdriver, and a lighter to seal the strap ends. Some kits also include their own tools and instructions.
Q5: Can I use a bicycle strap kit for a motorcycle helmet?
No, motorcycle helmet strap replacement requires components designed for higher-impact protection. Only use strap systems approved for motorcycle helmets.
Q6: Is it better to repair or fully replace a damaged strap?
Replacing the entire strap is the better option when there’s noticeable wear or damage to ensure maximum safety and reliability. Repairs may be temporary and could fail during a ride.
Q7: How long does a helmet strap usually last?
With regular use, helmet straps may need replacing every 1–3 years, depending on wear, sweat exposure, and weather conditions. Inspect them regularly for signs of deterioration.