
1. Introduction
Removing the front wheel on a bike with disc brakes may seem intimidating at first, especially for beginners, but it’s a straightforward task when done correctly. Whether you’re performing routine maintenance, fixing a flat, or packing your bike for transport, understanding how to safely and efficiently remove the front wheel is essential.
Disc brakes add a layer of precision and stopping power but require extra care during wheel removal to avoid damaging the rotor or brake caliper. In this guide, you’ll learn step-by-step how to remove a front wheel on a bike with disc brakes, whether it uses a quick-release skewer or a through-axle system.
We’ll also cover important safety checks, necessary tools, and practical tips to help you complete the process smoothly without causing unnecessary wear or misalignment. By the end, you’ll feel confident handling your disc-brake-equipped bike with the same ease as a seasoned rider.
Table of Contents
2. Understanding Rear Wheel Setups
When learning how to change a rear bike tire with gears, the first step is understanding the type of rear wheel setup your bike uses. Rear wheel configurations can vary based on axle type and drivetrain system, and each affects how you remove and replace the tire safely.
1. Rear Axle Types: Quick Release vs. Thru-Axle
- Quick Release (QR) Axles are found on many road and older mountain bikes. They use a lever to quickly loosen the axle without tools.
- Thru-Axles, common on modern mountain and disc brake bikes, require an Allen key or integrated lever to unscrew. They provide better stiffness and alignment but take slightly more time to remove.
👉 Pro Tip: If you’re unsure which axle you have, look at the ends of the axle. A QR has a lever; a thru-axle typically uses a bolt-through design with threaded ends.
2. Drivetrain Considerations
Rear wheels with gears involve a cassette, chain, and rear derailleur. Understanding how these interact is key:
- Cassette: Always shift to the smallest sprocket before removal—this reduces chain tension and eases wheel removal.
- Derailleur: The component that moves the chain between gears. You’ll need to gently pull it back when removing the wheel to free the chain.
3. Gear Compatibility and Setup Awareness
Changing a rear bike tire with gears can be simple with the right tools and preparation. Whether you’re dealing with a standard quick-release setup or removing a rear bike wheel with a thru-axle, having the essential tools on hand ensures a smoother, safer, and more efficient process.
🧰 Essential Tools Checklist
- Tire Levers
Used to pry the tire bead away from the rim without damaging the tube or wheel. Plastic ones are recommended to avoid scratching your rims. - Bike Pump or CO₂ Inflator
You’ll need this to re-inflate the tire after installing the new tube or tire. Make sure it’s compatible with Presta or Schrader valves, depending on your bike. - Allen Keys (Hex Wrenches)
Commonly required for bikes with a thru-axle. Most rear wheels use 5mm or 6mm Allen bolts to secure the axle. - Chain Keeper (Optional)
Helpful for maintaining chain tension and alignment when the wheel is removed, especially useful if you’re transporting or cleaning the bike. - Bike Repair Stand (Optional)
Keeps your bike stable and off the ground while working. While optional, it makes the job much easier and safer—especially when working alone. - Gloves and Clean Rag
Not essential, but useful for staying clean when handling greasy gears or tires. A rag also helps clean the wheel hub or cassette before reinstallation.
🛠️ Safety Tip
This reduces chain tension, making the wheel easier to remove and reinstall without derailing the chain or damaging the cassette.
Having these tools ready ensures you’re fully prepared for any type of wheel setup—whether it’s a mountain bike, road bike, or a bike without quick release.
3. Tools You’ll Need
- List of essential tools (hex keys, tire levers, chain keeper, etc.)
- Mention of motorcycle front/rear wheel tools for comparison (semantic relevance)
- Safety equipment (gloves, stand, rag)
4. How to Change a Rear Bike Tire with Gears (Step-by-Step)
Replacing the rear tire on a geared bicycle might seem complicated at first, but once you understand the process, it’s fairly simple. Whether you’re working with a mountain bike, a through-axle setup, or a bike without a quick release, the following instructions will help you handle the job safely and effectively.
✅ Step 1: Shift to the Smallest Rear Gear
Begin by shifting the chain onto the smallest cog of the rear cassette.
🔧 Pro Tip: Pedal gently while shifting to avoid dropping the chain or causing derailleur issues.
✅ Step 2: Disengage the Brake if Necessary
Most modern disc brakes don’t require any adjustment for wheel removal. However, if your bike features rim brakes or mechanical disc brakes, release the brake mechanism to create clearance for the tire.
✅ Step 3: Remove the Rear Wheel
- For Quick Release Hubs: Open the quick release lever and slightly loosen it. Then, carefully lift the wheel out of the dropouts.
- For Thru-Axle Systems: Use an Allen key (typically 5mm or 6mm) or a lever to remove the axle. Gently slide the wheel out while guiding the derailleur out of the way.
✅ Step 4: Deflate the Tire
If the tire still contains air, press the valve to release all the pressure.
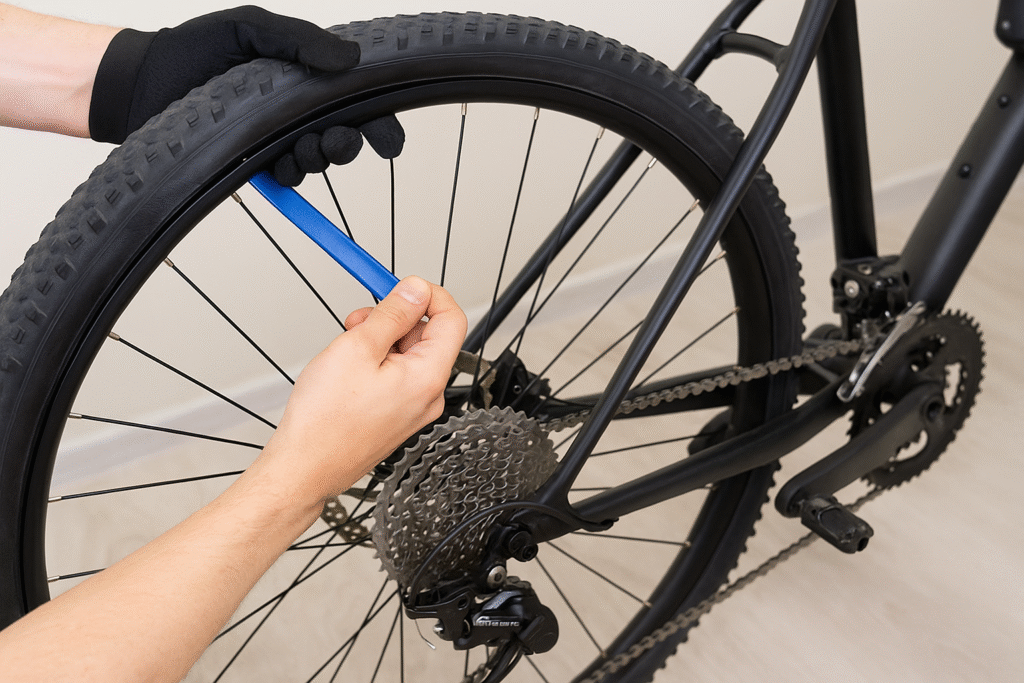
✅ Step 5: Separate Tire from Rim
Use tire levers to lift one side of the tire bead over the rim’s edge. Work your way around until one side is free, then remove the inner tube from inside the tire.
⚙️ If reusing the tube, check it for punctures, cracks, or worn spots before reinstalling.
✅ Step 6: Inspect the Tire and Rim
Before inserting a new tube, check both the tire and the inside of the rim for sharp debris or embedded glass that could cause another flat.
✅ Step 7: Insert the New Tube and Reseat the Tire
- Inflate the new inner tube slightly so it holds its shape.
- Use only your hands to seat the tire to avoid pinching or damaging the new tube.
✅ Step 8: Reattach the Rear Wheel
- Line the chain back onto the smallest rear cog.
- Lift the derailleur cage and align the wheel with the frame’s dropouts or axle mounts.
- Secure the quick release skewer or tighten the thru-axle firmly.
✅ Step 9: Inflate the Tire to Recommended Pressure
Using a bike floor pump or a CO₂ inflator, fill the tire to the PSI indicated on the tire’s sidewall. Make sure the tire beads are seated evenly all around.
✅ Step 10: Perform a Final Check
- Spin the rear wheel to confirm it’s centered and spins freely.
- Ensure that the derailleur shifts smoothly and the disc rotor is properly aligned inside the caliper.
- Give the brake a quick test to confirm responsiveness.
Changing a rear bike tire on a geared bike doesn’t have to be intimidating.
5. How to Remove Rear Bike Wheel with Through-Axle
Whether you’re replacing a tire, servicing the drivetrain, or packing your bike for travel, following the correct steps ensures safety and prevents damage to your frame or components.
✅ Step 1: Shift the Chain to the Smallest Cog
This step reduces chain tension and simplifies the removal and reinstallation process.
Professional Tip: Rotate the pedals while gently shifting to ensure the chain moves smoothly without skipping or jamming.
✅ Step 2: Stabilize the Bicycle
Use a bike repair stand if available. If not, place the bike upside down on a clean surface, ensuring the saddle and handlebars are protected. This provides a stable base and makes the process safer and more efficient.
✅ Step 3: Open and Remove the Through-Axle
Identify the through-axle type on your bike:
- Bolt-type through-axle: Use the appropriate Allen key (commonly 5mm or 6mm) to unscrew the axle in a counterclockwise direction. Remove it carefully.
Safety Reminder: Do not overtighten or strip the bolt head. Always use the correct tool for your specific axle system.
✅ Step 4: Disengage the Rear Wheel
Carefully pull the derailleur rearward with one hand to create clearance. With the other hand, lower the wheel gently out of the dropouts. The chain should slide off the cassette naturally.
Important: Avoid forcing the wheel out. Misalignment or resistance may indicate the chain is caught or the axle is not fully disengaged.
✅ Step 5: Protect the Brake Components
If your bike is equipped with disc brakes:
- Do not squeeze the brake lever while the wheel is removed. Doing so may cause the caliper pistons to close.
- Insert a brake pad spacer or a clean, non-metallic object (like a folded card) between the brake pads to keep them separated.
By following these steps, you ensure the safe and professional removal of your rear wheel with a through-axle system. Taking your time and using the proper technique protects your drivetrain, frame, and braking system—essential for both performance and longevity.
6. How to Remove Rear Wheel on Mountain Bike
Removing the rear wheel on a mountain bike is a fundamental maintenance task every rider should be familiar with. Whether you’re dealing with a flat tire, cleaning the drivetrain, or transporting your bike, doing it correctly helps avoid damage to components and ensures a smooth reinstallation.
To begin, it’s important to shift the chain to the smallest rear cog.
If your mountain bike uses rim brakes or mechanical disc brakes, you may need to release the brake mechanism to allow enough clearance. For most modern mountain bikes with hydraulic disc brakes, no brake adjustment is necessary, but it’s essential to avoid squeezing the brake lever once the wheel is off to prevent the caliper pistons from closing.
The axle system plays a key role in the removal process. For bikes equipped with a quick-release mechanism, simply open the lever and loosen the nut if needed. For those using a through-axle system, use a compatible Allen wrench or the built-in lever to unscrew and slide out the axle. Set the axle aside in a clean area to avoid contamination, especially if your bike uses disc brakes.
Once the axle is disengaged, gently pull the rear derailleur backward to create clearance, then lift the wheel out of the dropouts. Ensure the chain is free from the cassette and that the disc rotor clears the brake caliper without resistance.
Before reinstallation, inspect the derailleur hanger, cassette, and rotor for debris or wear. Keeping these components clean not only prolongs their lifespan but also ensures smooth operation during future rides.
Removing the rear wheel of a mountain bike may seem daunting at first, especially without a quick-release system, but with proper technique and care, it becomes a simple and essential part of regular bike maintenance.
7. Removing Rear Bike Wheel Without Quick Release
Removing a rear bike wheel without a quick-release lever requires a bit more effort and the right tools, but it’s a straightforward process when done properly. This type of axle setup, commonly found on older bikes, entry-level models, or heavy-duty commuter bicycles, typically uses axle nuts secured with standard wrenches.
To start, place your bike on a stable surface or use a bike repair stand for better access. Shift the chain onto the smallest rear cog to reduce tension in the derailleur and make wheel removal easier.
You’ll need a properly sized wrench—usually 15mm—to loosen the axle nuts on both sides of the rear wheel. Turn each nut counterclockwise, alternating sides to evenly relieve pressure. If your bike has built-in axle washers or chain tensioners, take note of their position and orientation before removing them.
Once the nuts are loosened, gently pull back the rear derailleur to make room and lift the wheel out of the dropouts. Carefully guide the chain off the cassette while ensuring that the wheel clears the brake mechanism. For bikes with rim brakes, it may be necessary to release the brake cable or spread the pads apart for adequate clearance.
If the wheel seems stuck, check for corrosion or debris near the dropouts and use a soft mallet if needed—never pry with sharp tools.
Before reinstalling the wheel, inspect the axle threads, nuts, and dropout slots. Clean and lightly grease the threads to prevent seizing. Make sure the chain is properly seated on the smallest cog and that the wheel is centered before tightening the nuts securely.
With the right approach, it can be done safely and efficiently, even trailside.
8. Tips for Motorcycle Enthusiasts (Semantic Crossover)
While bicycles and motorcycles differ in power and mechanics, many foundational principles of wheel removal, tire maintenance, and safety overlap. For motorcycle enthusiasts transitioning to or maintaining bicycles—or vice versa—understanding these parallels can enhance efficiency and care in both disciplines.
1. Use the Right Tools
Motorcycle maintenance often requires precision tools like torque wrenches and axle stands. Similarly, when changing a rear bike tire with gears, having proper tools like tire levers, a chain whip, or through-axle compatible wrenches can make the job smoother. Always match the tool to the axle type—whether you’re dealing with a through-axle on a mountain bike or a motorcycle axle secured by a cotter pin or castle nut.
2. Understand Axle Systems
Motorcyclists are familiar with axle types that require more structured removal (e.g., cotter pins, spacers, or alignment marks). Bicycles with bolt-on axles or no quick release demand a similar approach. In both cases, track component orientation during disassembly to ensure accurate reinstallation.
3. Brake Awareness is Key
Motorcycle riders know to disengage calipers or ABS sensors before removing a wheel. Likewise, when working with rim or disc brakes on bicycles, ensure brake calipers are disengaged or spaced to prevent damage. Avoid pulling levers while wheels are off—on both bikes and motorcycles.
4. Chain and Gear Positioning
Whether you’re removing a motorcycle wheel with a chain-driven setup or shifting a geared bicycle, always set the chain to the smallest cog or sprocket. This minimizes chain tension and reduces the risk of derailleur damage or misalignment.
5. Clean and Inspect During Removal
Motorcycle maintenance culture encourages inspecting bearings, threads, and seals during disassembly—this is a best practice for bicycles too. Check the cassette, dropout area, and derailleur alignment every time the rear wheel is off. For motorcycles, check sprocket wear and tension.
6. Prioritize Safety and Precision
Bikes may be lighter than motorcycles, but precision still matters. Tighten axle nuts or quick releases to manufacturer torque specs. Similarly, ensure motorcycle axle bolts are secured to proper torque and with locking pins where required. Never rush reassembly—mechanical integrity is key to safety on both.
By recognizing the mechanical similarities and cross-applying maintenance habits, motorcycle enthusiasts can become highly proficient at bicycle maintenance. This crossover of experience enhances mechanical understanding, promotes safety, and builds confidence across two-wheeled platforms.
9. Reinstalling the Rear Wheel and Final Adjustments
Whether you’re working on a mountain bike, road bike, or hybrid, ensuring precise reinstallation is essential for safe, smooth performance—especially when dealing with rear wheels and gears.
Step-by-Step Guide to Reinstalling the Rear Bike Wheel
1. Align the Chain on the Smallest Cog
This helps the cassette slide in easily and prevents tension or derailleur damage.
2. Position the Wheel in the Dropouts or Thru-Axle Slots
Lift the bike frame slightly and guide the wheel into the rear dropouts or through-axle frame slots. Make sure the axle is seated evenly on both sides. For thru-axles, ensure the axle shaft slides smoothly through and threads cleanly.
3. Reattach or Tighten the Axle Mechanism
- Quick Release: Close the lever firmly without excessive force.
- Bolt-On Axle: Use a torque wrench or adjustable spanner to tighten each nut evenly.
- Thru-Axle: Insert and thread the thru-axle carefully. Tighten to the manufacturer’s torque specifications.
4. Reconnect or Check the Brakes
Ensure the rear brake caliper is properly aligned with the disc or rim. Spin the wheel to check for rubbing or misalignment. If there’s friction, adjust the caliper positioning slightly or center the brake pads.
5. Confirm the Chain Is Running Smoothly
Rotate the pedals gently and observe the chain movement. If the chain skips or derails, shift through the gears to ensure alignment and indexing are correct.
6. Test Wheel Alignment and Tightness
Give the wheel a firm side-to-side wiggle to check for play. It should feel secure with no lateral movement.
7. Do a Safety Spin Test
Listen for odd noises and confirm brake clearance. Shift through all rear gears to verify derailleur alignment and gear indexing.
Pro Tips:
- Always lubricate the chain and inspect derailleur hangers during wheel installation to prevent future shifting issues.
- Avoid overtightening quick releases or bolts, which can damage frame dropouts or strip threads.
Correct rear wheel installation ensures optimal drivetrain function and rider safety. Taking a few extra minutes to align, secure, and test the wheel can prevent costly damage or unsafe riding conditions down the road.
10. Conclusion
Knowing how to remove and reinstall a bike wheel with disc brakes is an essential skill every cyclist should master. Whether you’re dealing with a flat tire, transporting your bike, or performing routine maintenance, understanding the correct steps ensures your bike stays safe, functional, and road-ready.
For bikes with disc brakes and no quick release, the process may seem a bit more involved, but with the right tools, careful handling, and proper alignment, it becomes second nature. Always remember to secure the axle firmly, check brake caliper clearance, and confirm gear alignment before your next ride.
By following these professional tips and safety checks, you not only protect your bike components but also boost your confidence and independence as a rider. Practice these steps regularly so you’re prepared for real-world situations—whether on the trail, the road, or in your garage
11. FAQs
1. How do I remove a rear bike wheel with a through-axle?
To remove a rear wheel with a through-axle, shift to the smallest rear cog, open the through-axle lever (or use a hex wrench if required), and carefully slide the axle out while supporting the wheel. Gently pull the wheel down and out from the frame, making sure the disc brake rotor clears the caliper.
2. What’s the difference between quick release and non-quick release bike wheels?
Quick release wheels have a lever-operated skewer for easy removal, while non-quick release wheels use bolts or a through-axle that may require a wrench or hex key. Non-quick release systems typically offer more rigidity and are common on modern mountain and disc-brake bikes.
3. Can I remove the rear wheel without shifting gears first?
It’s strongly recommended to shift the chain onto the smallest rear cog before removing the wheel. This reduces chain tension, makes reinstallation easier, and helps avoid misalignment or chain drops during the process.
4. What tools do I need to remove a mountain bike rear wheel?
For most modern mountain bikes, you’ll need a 5mm or 6mm hex key for through-axles. Some older bikes may require a 15mm wrench for bolt-on hubs. Always keep a multitool with these bits for trailside repairs.
5. Why won’t my rear wheel come off after removing the axle?
Common reasons include: The chain or derailleur is under tension. The brake caliper is interfering with the rotor.
6. Do I need to deflate the tire to remove the rear wheel?
Usually, no. However, if you’re working with a tight frame or rim brakes (less common with rear disc setups), letting out some air can make removal smoother.
7. How do I avoid damaging my disc brakes during wheel removal or installation?
Doing so can cause the pads to close and make reinstallation difficult. Use a pad spacer if needed, and always handle the rotor by its edge to avoid contamination.
8. Can I use motorcycle wheel removal techniques on a bicycle?
While some basic principles overlap (like axle removal and alignment), bicycle wheels—especially with disc brakes—require less force and specialized tools. Avoid using motorcycle tools unless designed for both.