
1. Introduction
Dealing with a flat tire mid-ride can be frustrating—especially when you’re in a hurry or don’t have the tools to take everything apart. The good news? You can learn how to fix a flat bike tire without removing it, saving both time and hassle. Whether you’re riding a regular bicycle or an electric bike with a hard-to-access rear wheel, there are smart workarounds that make repairs easier, even for beginners.
Traditionally, fixing a flat involved removing the wheel and tire, often requiring tools like the best bicycle tire levers or even specialty gear like a tire monkey tire lever. But now, with tubeless sealants, patch kits, and quick fixes, it’s possible to repair a puncture without disassembling your entire setup.
If you ride an e-bike, knowing how to remove an electric bike rear wheel can still be useful—but avoiding the need altogether is even better. This is especially helpful when you’re on the go or lack access to tools like motorcycle tire spoons or how to remove bike tire without lever techniques.
This guide covers everything you need to know—from quick fixes to pro tips—so you can confidently handle a flat tire without removing it, and get back on your ride faster than ever.
Table of Contents
2. Can You Really Fix a Flat Bike Tire Without Removing It?
Yes, you can fix a flat bike tire without removing it—and it’s a handy trick every cyclist should know. Whether you’re on the road, on a trail, or don’t have tools like the best bicycle tire levers or tire monkey tire lever with you, this method can save your ride. The process takes a bit of patience but is completely doable, especially for smaller punctures.
When Is It Possible?
You can fix a flat tire without removing it in these situations:
- The puncture is small and visible without needing to take off the tire.
- The inner tube isn’t shredded or torn near the valve area.
- You have access to a puncture repair kit or DIY household alternatives like super glue, duct tape, or rubber solution.
This approach is especially useful when dealing with rear tires, such as on electric bikes or bikes with complex gear systems, where removing the rear wheel can be challenging.
Basic Tools You Might Need
Even without removing the tire, a few tools (or alternatives) will help:
- A bicycle pump or CO₂ inflator
- Soapy water or spit to find the leak
- Household glue or rubber cement (if no patch kit)
- A piece of rubber, inner tube, or sturdy tape for sealing
Pro Tip: If you have to remove the tire later, tools like the best motorcycle tire spoons or a tire monkey tire lever make the job easier.
Quick Note on Rear Wheels
Learning how to change a rear bike tire tube or how to remove an electric bike rear wheel can be time-consuming in an emergency. Fixing the flat without removing the tire is a smart shortcut—especially if you’re mid-ride or don’t have all your gear.
Final Takeaway
Knowing how to fix a flat bike tire without removing it is a practical skill every cyclist should master. It’s not only possible—it’s often the fastest way to get back on the road without needing a full toolkit.
3. Tools You’ll Need for On-the-Go Repairs
If you want to learn how to fix a flat bike tire without removing it, having the right tools in your saddlebag can make all the difference. On-the-go repairs don’t require a full workshop—just a few compact, practical items that help you patch things up quickly and get rolling again.
Whether you’re dealing with a standard flat or trying to avoid the hassle of how to remove an electric bike rear wheel, the following tools are a must-have for cyclists of all levels.
Essential Repair Tools to Carry
Here’s what you should always pack for roadside or trail repairs:
- Mini Pump or CO₂ Inflator: For reinflating your tire after the fix. CO₂ is faster, but a mini pump won’t run out of air.
- Puncture Repair Kit: Includes glue, patches, and sandpaper. These kits are lightweight and essential for fixing small tube punctures without removing the tire.
- Tire Levers (Optional): While you’re learning how to remove bike tire without lever, having a compact set of the best bicycle tire levers—or a tire monkey tire lever—can still save you time in trickier situations.
- Glueless Patches: Perfect for quick fixes without waiting for glue to dry.
- Valve Core Tool: Helpful if you need to deflate or check the valve during a repair.
- Multi-tool with Allen Keys: To adjust brake clearance or components, especially helpful if you accidentally bump parts while fixing the tire.
- Protective Gloves or Wipes: For keeping your hands clean while working on a dirty wheel.
Bonus Gear for Longer Rides
For longer adventures or rides in remote areas, consider carrying:
- Spare Tube: If patching fails or the hole is too large.
- Best Motorcycle Tire Spoons: If you ever do need to remove a tough tire, these offer better leverage than standard levers.
- Small Flashlight or Headlamp: For visibility during dusk or nighttime repairs.
- Duct Tape or Zip Ties: Emergency solutions for unexpected damage beyond a flat.
Why It Matters
Fixing a flat on the go—especially how to fix a flat bike tire without removing it—means you avoid long delays, expensive tows, or walking your bike home. Being prepared also boosts your confidence, especially when tackling rough terrains or learning how to change a rear bike tire tube for the first time.
Quick Recap
Having a compact repair kit tailored for roadside emergencies can save your ride. Whether you’re fixing a puncture without removing the tire or tackling something more complex, the right tools keep you moving forward safely and efficiently.
4. Step-by-Step: How to Fix a Flat Bike Tire Without Removing It
Believe it or not, you can repair a flat tire without taking it off the bike. Whether you’re out on a trail or just trying to save time, knowing how to fix a flat bike tire without removing it can be a total game-changer. This method works best for small punctures in the inner tube, especially when the tire bead remains seated on the rim.
Here’s a simple, beginner-friendly step-by-step guide to walk you through the process.
Step 1: Find the Flat Area
Before anything else, spin your wheel slowly and inspect the tire. Listen for a quiet hissing sound or feel for escaping air. If needed:
- Submerge the tube section (still inside the tire) in water if you’re near a source—it’ll bubble where the puncture is.
- If you’re experienced with how to remove a bike tire without a lever, you can gently unseat just a portion of the tire near the puncture without removing the entire tire.
Step 2: Partially Deflate and Unseat a Small Section
Once you’ve found the leak:
- Deflate the tire partially to relieve pressure.
- Use your thumbs or the best bicycle tire levers (or a tire monkey tire lever) to unseat a small part of the tire—just enough to expose the tube underneath.
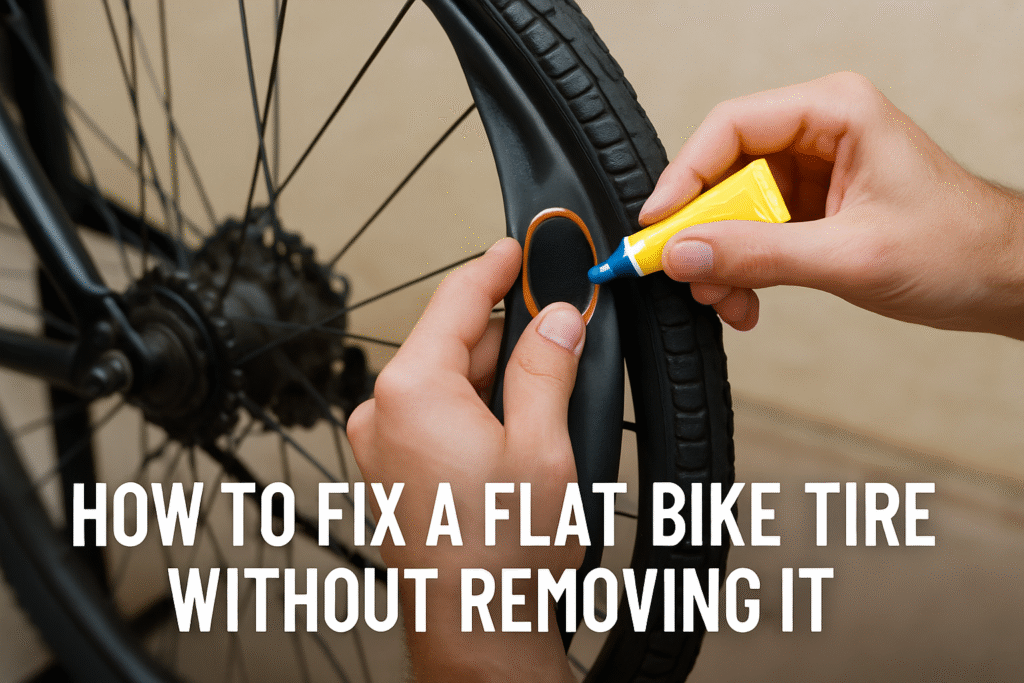
Step 3: Pull Out and Patch the Tube
With the tube now exposed:
- Gently pull out a small section of the inner tube near the puncture.
- Dry the area and roughen it slightly using the sandpaper from your patch kit.
- Apply glue (if using a traditional patch), wait for it to get tacky, then stick the patch firmly over the hole.
- If you’re using glueless patches, just peel and press.
Let it sit for a minute or two before reinserting it.
Step 4: Reinsert Tube and Reseat the Tire
- Massage the tire bead back into the rim using your hands or tools like best motorcycle tire spoons (if absolutely necessary).
- Avoid pinching the tube while reseating.
Step 5: Inflate and Check
Now:
- Inflate the tire slowly, checking that the bead is evenly seated around the rim.
- Listen and feel for any more air leaks.
- Once inflated, give the tire a gentle spin to make sure everything is aligned and rolling smoothly.
Pro Tip for E-Bike Riders
If you’re riding an electric bike, this technique is especially useful, since how to remove an electric bike rear wheel can be a tricky task due to motor wiring. This method lets you patch the tube with minimal disassembly.
Final Takeaway
Learning how to fix a flat bike tire without removing it is a valuable skill that saves time, hassle, and even your ride. With a little practice and the right tools, you’ll be back on the road or trail in minutes—no full teardown required.
5. Tips for E-Bikes and Rear Tire Repairs
Fixing a flat on a regular bike is one thing—but doing it on an electric bike, especially the rear wheel, can be a lot trickier. Fortunately, there are clever workarounds to make repairs easier—without disconnecting anything.
Here’s how to approach e-bike flats like a pro.
Why Rear Flats Are More Complicated on E-Bikes
Electric bikes often have:
- Hub motors integrated into the rear wheel
- Wires connected to motor controls and sensors
- Thicker tires that are harder to manipulate
Removing the rear wheel can require tools, technical know-how, and sometimes even voiding the warranty if you’re not careful. That’s why learning how to patch a flat without removing the tire can save time and effort.
Smart Repair Tips for Rear E-Bike Flats
To repair a flat tire on an e-bike rear wheel, follow these practical tips:
1. Only Unseat a Small Portion of the Tire
- Use your thumbs to gently push the bead off the rim near the puncture area.
- If it’s tight, a tire monkey tire lever or best bicycle tire levers can help without damaging the rim or motor housing.
2. Pull Out Just Enough Tube
- Expose only the section of the inner tube where the leak is located.
- This keeps the wheel, motor, and wiring intact.
3. Patch Without Full Disassembly
- Let it sit for a minute, then reinsert the tube and reseat the tire bead.
Tools That Make the Job Easier
When dealing with e-bikes or tight tire beads, these tools can save the day:
- ✅ Best motorcycle tire spoons – useful for strong leverage without pinching
- ✅ Portable patch kits – ideal for on-the-go repairs
- ✅ Mini pump or CO2 inflator – for quick inflation
What If the Tube Needs Full Replacement?
Sometimes patching isn’t enough, and you’ll need to know how to change a rear bike tire tube. If that’s the case:
- Carefully disconnect the motor wiring (take pictures beforehand for reassembly).
- Loosen bolts or quick-release levers.
- Slide out the wheel, replace the tube, and reinstall everything correctly.
However, always check your e-bike manual first, as designs can vary.
Final Takeaway
If you ride an electric bike, especially one with a hub motor, it pays to learn how to fix a flat bike tire without removing it. With the right tools and a bit of patience, you can repair rear flats without detaching the wheel—keeping your ride smooth and your hands clean.
6. When You Should Remove the Tire
Learning how to fix a flat bike tire without removing it is incredibly helpful—but it’s not always the best or safest solution. In some situations, removing the tire completely is necessary for a proper repair or replacement. Let’s break down when and why you should take that extra step.
1. The Puncture Is Too Large to Patch
Small punctures from thorns or glass shards can often be patched while the tire is still on the rim. However, if:
- The hole is too large
- The tube is torn or shredded
- The tire casing is damaged internally
Then patching won’t hold.
2. The Inner Tube Keeps Pinching
If you’ve already tried a quick repair and the tube keeps pinching or popping, it’s time to take the tire off completely. A full inspection of the inside of the tire helps:
- Remove hidden debris (glass, staples, etc.)
- Align the tube properly
- Avoid future flats from unnoticed sharp objects
Even the best bicycle tire levers or a tire monkey tire lever can only help so much—sometimes hands-on precision is required.
3. The Valve Stem Is Damaged or Misaligned
If the valve stem is bent, leaking, or pushing through at an odd angle, removing the tire allows you to:
- Realign or replace the tube correctly
- Avoid damaging your rim or pump head
This issue is especially common on rear wheels, so if you’re unsure how to remove electric bike rear wheel components safely, consult your bike’s manual before proceeding.
4. You’re Dealing with a Rear Flat on a Hub Motor E-Bike
If the tire bead won’t unseat or the tube can’t be accessed cleanly, you may need to:
- Disconnect motor wiring
- Use best motorcycle tire spoons for added leverage
- Follow the correct steps to change a rear bike tire tube safely
When Quick Fixes Just Won’t Cut It
In summary, removing the tire becomes essential when the damage is extensive, alignment is off, or the problem isn’t visible from the outside. While knowing how to repair a flat without removal is valuable, knowing when not to is just as important for long-term bike health and safety.
👉 Takeaway: Quick fixes are great, but for deep punctures, damaged tubes, or rear-wheel complications, don’t hesitate to remove the tire and do it right.
7. Pro Tips to Prevent Future Flats
Once you’ve learned how to fix a flat bike tire without removing it, the next step is making sure you don’t have to do it again anytime soon. Prevention is key—and with a few smart habits and gear upgrades, you can reduce the chances of getting stranded with a flat tire again.
1. Upgrade to Puncture-Resistant Tires
Invest in tires with built-in puncture protection. Many brands now offer reinforced layers that block thorns, glass, and sharp debris before they reach your inner tube.
- Great for commuters and long-distance riders
- Especially useful for electric bikes, which carry more weight and face higher risk of flats
2. Use Sealant or Slime in Your Tubes
A simple yet powerful trick: add tube sealant inside your bike tubes. When a small puncture occurs, the sealant automatically fills and seals it—often without you even noticing.
- Works well for minor punctures
- Ideal for riders who want to avoid constant repairs
- Complements the method of how to fix a flat bike tire without removing it
3. Check Tire Pressure Regularly
Underinflated tires are more prone to pinch flats (aka “snake bites”), especially when riding over potholes or curbs.
4. Use Tire Liners or Tougher Tubes
Tire liners are a physical barrier between your tire and inner tube. They’re easy to install and add a huge layer of protection. Also, consider using thicker tubes or even thorn-resistant tubes for added durability.
5. Avoid Riding Near the Edge of the Road
Most road debris—glass shards, thorns, and metal scraps—accumulates near the curb. Shift slightly inward when it’s safe to do so, especially after storms or in construction zones.
6. Inspect Tires After Every Ride
Make it a habit to quickly check your tires after each ride:
- Look for embedded glass or sharp objects
- Gently pry out anything stuck with your fingers or a tire monkey tire lever
Even the best bicycle tire levers won’t help much if the tire is already compromised by hidden debris you missed earlier.
7. Practice Safe Removal Techniques
If you ever need to remove your tire (for example, how to change a rear bike tire tube or how to remove electric bike rear wheel), using the right tools—like best motorcycle tire spoons or ergonomic levers—helps protect your rims, tubes, and hands from damage.
Stay Ahead of Flats with Smart Habits
👉 Takeaway: While learning how to fix a flat bike tire without removing it is a great skill, preventing flats in the first place saves you time, effort, and frustration. Invest in better gear, ride smart, and keep an eye on tire condition to enjoy smooth, worry-free rides.
8. Conclusion
Learning how to fix a flat bike tire without removing it can be a game-changer—especially for beginners, commuters, or riders who want a quick solution on the go. With just a few tools, some sealant or patches, and the right technique, you can get back on the road in minutes without pulling your wheel off or fumbling with a chain.
This method is particularly helpful when:
- You’re dealing with a rear tire and want to avoid the hassle of how to remove electric bike rear wheel or how to change a rear bike tire tube
- You don’t have tools like tire spoons or tire monkey tire levers on hand
- You want a quicker fix during a ride or in a pinch
However, while skipping wheel removal is convenient, it’s not a substitute for a proper repair when you’re back home. If your tire continues to lose air, take the time to remove it using tools like the best bicycle tire levers or even best motorcycle tire spoons for heavier-duty jobs.
9. FAQs
1. Is it really possible to fix a flat without removing the tire?
Yes! If the puncture is small and accessible, you can often patch it externally or use tire sealant. This is especially useful for tubeless setups or quick roadside fixes.
2. What tools do I need for a no-removal repair?
You’ll typically need:
A tire sealant or patch kit
An air pump or CO₂ inflator
Optional: A tire monkey tire lever if you need to slightly unseat the bead
3. Can I fix the rear tire of an electric bike without removing it?
Yes, but it’s a bit more challenging. If you’re avoiding how to remove electric bike rear wheel (which can be complex due to wiring), using a sealant through the valve stem is often your best bet.
4. How long will a no-removal patch last?
It depends on the type of fix. Sealants may last for weeks or months, while an external patch is more temporary. Eventually, a proper repair—like removing the tube—is recommended.
5. Is it necessary to use tire levers to take off a bike tire?
Not always. You can learn how to remove bike tire without lever by using your hands and proper technique, especially on flexible tires. However, for tight beads, the best bicycle tire levers make removal much easier.
6. Are motorcycle tire spoons good for bikes?
Best motorcycle tire spoons are durable and useful, but they’re usually overkill for bicycles. Stick to bike-specific tools unless you’re dealing with very stiff tires.