
Introduction
A loose crank is a common but serious problem for mountain bike riders, especially when riding on rough trails or uneven terrain. If not fixed early, it can affect pedaling efficiency, cause annoying noises, and lead to expensive drivetrain damage. Understanding how to fix a loose crank on a mountain bike helps riders maintain control, improve performance, and ride safely. With basic tools and the right approach, most crank issues can be identified and corrected before they become major mechanical failures.
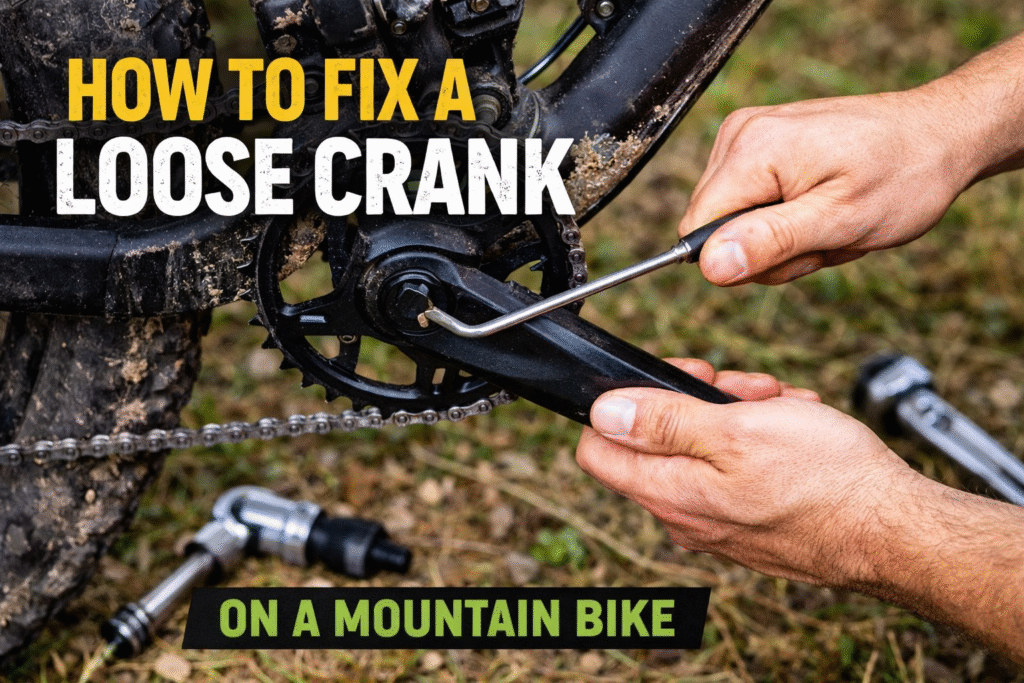
Table of Contents
How to Fix a Loose Crank on a Mountain Bike
A loose crank is a common mountain bike problem that should never be ignored. If left unfixed, it can damage the crank arm, bottom bracket, or even cause a crash. Understanding the correct repair method helps you ride safely and avoid costly replacements.
Step 1: Confirm the Crank Is Actually Loose
Before fixing anything, check whether the issue is the crank arm or just the pedals. Hold one crank arm and try to wiggle it side to side.
- Side-to-side movement usually means a loose crank arm mountain bike issue
- Clicking sounds or wobble while pedaling often point to a crank problem, not pedals
This step prevents misdiagnosis, which is a common beginner mistake.
Step 2: Inspect the Crank Bolt
Most mountain bikes use an Allen bolt in the center of the crank arm. Dirt, water, or vibration can cause this bolt to loosen over time.
- Look for visible gaps between the crank arm and bottom bracket
- Check for rust or rounded bolt heads
If the bolt looks damaged, tightening alone may not solve the issue.
Step 3: Tighten the Crank Bolt Correctly
Use the correct allen key for bike crank and turn the bolt clockwise. Apply steady pressure rather than forcing it.
- Tighten evenly and slowly
- Stop if resistance feels abnormal
This is the most effective mountain bike crank loose fix when caught early.
Step 4: Check Torque and Test for Wobble
Overtightening is just as harmful as riding loose. If available, use a torque wrench and follow recommended torque specs for bike crank.
After tightening:
- Spin the cranks freely
- Test for side movement
- Take a short, slow test ride
If the crank still moves, further inspection is needed.
Step 5: Identify Deeper Issues
If tightening does not work, the crank arm interface may be worn. Repeated riding while loose can permanently damage the connection.
Signs include:
- Crank arm keeps coming loose
- Persistent crank wobble mountain bike symptoms
In these cases, crank removal or replacement may be required.
Common Beginner Mistakes to Avoid
- Riding with a loose crank “just once”
- Using the wrong size Allen key
- Ignoring early clicking or slipping sounds
- Confusing pedal looseness with crank looseness
Safety & Maintenance Tips
- Never ride aggressively until the issue is fixed
- Check crank tightness after muddy or wet rides
- Inspect crank bolts during regular bike cleaning
Knowing how to fix a loose crank on a mountain bike early protects your drivetrain, improves pedaling efficiency, and keeps your ride safe—especially on rough trails.
How to Repair Bike Crank Wobble Permanently
Crank wobble is a warning sign that something in the crank system is no longer seated or supported correctly. A permanent repair requires more than a quick tighten—it means identifying the worn interface and correcting it so the problem doesn’t return.
Identify the Source of the Wobble
Start by confirming where the movement comes from. Hold one crank arm and try to move it side to side while the bike is stationary.
- If the arm moves independently, the crank interface is likely worn or loose
- If both arms move together, look for bottom bracket loose symptoms, such as play in the bearings
Misidentifying the source is a common beginner mistake and leads to repeated failures.
Remove the Crank Arm for Inspection
To fix wobble permanently, the crank arm usually needs to come off. Use the correct crank puller tool for your crank type. Removing the crank allows you to:
- Inspect the crank arm interface (square taper or splines)
- Check for rounding, cracks, or polished wear marks
- Clean dirt and grease that may prevent proper seating
If the interface looks damaged, tightening alone will not hold.
Check the Bottom Bracket Condition
With the crank removed, spin the bottom bracket spindle by hand. It should rotate smoothly with no grinding or side play.
- Grinding indicates worn bearings
- Side movement suggests a loose or failing bottom bracket
A worn bottom bracket must be replaced, or the crank wobble mountain bike issue will continue even with a new crank arm.
Reinstall and Torque the Crank Correctly
If the crank arm and bottom bracket are in good condition, reinstall the crank carefully:
- Seat the crank arm fully onto the spindle
- Tighten the crank bolt gradually and evenly
- Follow recommended torque specs for bike crank to prevent under- or over-tightening
Overtightening can strip threads, while undertightening allows movement to return.
Test Under Load
After reassembly, test the bike:
- Spin the cranks freely
- Apply firm pedal pressure while holding the bike
- Take a short test ride on flat ground
If any movement remains, the crank arm is likely worn beyond repair and must be replaced.
Common Beginner Mistakes to Avoid
- Riding repeatedly with a loose crank
- Skipping crank removal when wobble persists
- Reusing a damaged crank arm
- Ignoring early clicking or slipping sensations
Safety and Maintenance Tips
- Never ride trails with active crank wobble
- Check crank tightness after hard or muddy rides
- Inspect crank bolts during routine maintenance
Permanent repair requires addressing the root cause—not just tightening. When done correctly, this approach also supports long-term reliability and complements knowing how to fix a loose crank on a mountain bike safely and effectively.
How Long Does It Take to Fix a Loose Crank?
The time required to fix a loose crank depends on the cause of the problem and the condition of the bike. In many cases, it’s a quick adjustment. In others, it can take longer if parts are worn or damaged. Knowing what to expect helps riders decide whether they can handle the repair themselves or need professional help.
Quick Fix: Tightening a Loose Crank Bolt
If the crank arm is loose but not damaged, the repair is usually fast. Using the correct Allen key, tightening the crank bolt typically takes 5 to 10 minutes.
This applies when:
- The crank arm interface is still in good condition
- There is no visible crank wobble
- The issue is caught early
This is the most common situation and often solves a loose crank arm mountain bike problem immediately.
Moderate Repair: Removing and Reinstalling the Crank
If the crank continues to move after tightening, removal and inspection are necessary. This process involves taking off the crank arm, cleaning the interface, and reinstalling it properly.
Time required: 20 to 30 minutes
This step is common when:
- The crank arm keeps coming loose
- Dirt or corrosion prevents proper seating
- The rider wants a more reliable fix
Many beginners skip this step, which leads to repeated loosening.
Longer Repair: Worn Crank or Bottom Bracket Issues
When the crank arm or bottom bracket is worn, the repair time increases. Replacing parts can take 45 to 90 minutes, depending on experience and tools.
Signs that indicate this level of repair include:
- Persistent crank wobble mountain bike symptoms
- Grinding or side-to-side play in the bottom bracket
- Clicking noises that return after tightening
In these cases, knowing how to fix a loose crank on a mountain bike also means recognizing when replacement is the only safe option.
Common Beginner Mistakes That Increase Repair Time
- Riding the bike after noticing looseness
- Overtightening the crank bolt
- Using the wrong size Allen key
- Ignoring early clicking or slipping sensations
These mistakes often turn a quick fix into a long repair.
Safety and Maintenance Tips
- Always test the crank before riding trails
- Recheck tightness after the first ride
- Inspect crank bolts during regular bike cleaning
For most riders, fixing a loose crank is a short job when addressed early. Delays allow wear to develop, increasing both repair time and cost.
Conclusion
A loose crank is a small issue that can quickly turn into a serious safety and performance problem if ignored. Learning how to fix a loose crank on a mountain bike early helps protect the crank arm, bottom bracket, and overall drivetrain from unnecessary damage. With the right tools, proper tightening, and regular checks, most crank issues can be fixed at home in a short amount of time. Routine inspection and timely maintenance not only improve pedaling efficiency but also ensure a safer and more reliable ride on the trails.
FAQs
1. Why does my mountain bike crank keep coming loose?
A crank usually keeps coming loose due to improper tightening, worn crank arm interfaces, or riding aggressively on rough trails. If the crank bolt is not tightened to the correct torque, movement develops and worsens over time.
2. Is it safe to ride with a slightly loose crank?
No, even a slightly loose crank can cause serious damage. Riding in this condition can wear out the crank arm and bottom bracket quickly and increases the risk of losing control while pedaling.
3. What tools do I need to fix a loose crank on a mountain bike?
Most fixes require an Allen key that fits the crank bolt. For deeper repairs, a crank puller and a torque wrench may be needed to ensure proper installation and long-term reliability.
4. Can a loose crank damage the bottom bracket?
Most fixes require an Allen key that fits the crank bolt. For deeper repairs, a crank puller and a torque wrench may be needed to ensure proper installation and long-term reliability.
5. How often should I check my bike crank for looseness?
It’s best to check crank tightness every few weeks or after hard trail rides. Regular inspections help catch problems early and prevent more expensive repairs later.