
1. Introduction
Learning how to remove bike grips without cutting is a simple yet essential skill for cyclists and motorcycle riders alike. Whether you’re upgrading your handlebars, switching to Renthal lock-on grips, or figuring out how to remove handlebar grips on a motorcycle, avoiding damage to your grips can save time and money.
Many riders mistakenly cut off grips that could have been easily removed and reused with the right technique. In this guide, we’ll walk you through safe, effective, and damage-free ways to remove and reinstall your grips—covering both mountain bikes and motorcycles, including tips on how to install motorcycle grips without glue. Let’s dive in and make your next handlebar upgrade smooth and stress-free.
Table of Contents
2. Why Avoid Cutting Grips Off?
- Preserves the condition of premium grips like Renthal lock-on grips or half waffle grips, which are designed to be reusable.
- Cutting grips can damage handlebars or throttle sleeves, especially when dealing with motorcycle grips or mountain bike handlebars.
- Knowing how to remove bike grips without cutting helps extend the life of the grips and avoids unnecessary replacement costs.
- Ideal for riders planning to reinstall the same grips on another bike or after maintenance.
- Essential when working with grips that don’t use glue, especially if you plan to install motorcycle grips without glue later.
- Cutting through grips may leave adhesive residue or rubber pieces that make new grip installation harder.
- Avoiding cuts reduces the risk of injury or scratching surrounding components like brake levers or shift cables.
- Smart grip removal supports eco-friendly maintenance by reducing waste and encouraging gear reuse.
3. Tools and Materials You’ll Need
- Flathead screwdriver or plastic pry tool – Helps gently lift the grip edge without tearing the rubber.
- Rubbing alcohol or soapy water – Acts as a non-damaging lubricant to slide grips off easily.
- Air compressor (optional) – A powerful tool for removing tight grips cleanly, especially on motorcycles or MTB bars.
- Grip glue or hairspray – Used for reinstalling grips securely without permanent bonding.
- Shop rag or microfiber cloth – For wiping away residue and keeping the handlebar clean.
- Isopropyl alcohol spray bottle – Ideal for loosening friction-fit grips quickly and safely.
- Torque wrench (if reinstalling lock-on grips) – Ensures proper reinstallation torque for grips like Renthal lock-on grips.
4. Step-by-Step Guide: How to Remove Bike Grips Without Cutting
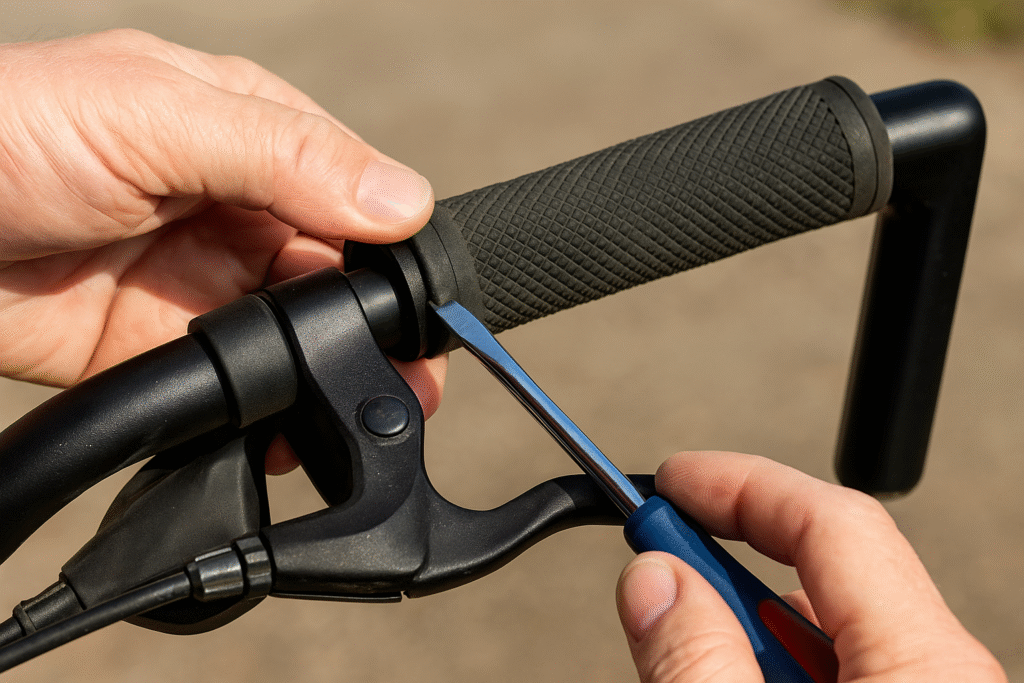
- Insert a flathead screwdriver or plastic pry tool gently under the grip edge to create a small gap without damaging the rubber.
- Spray a small amount of rubbing alcohol or soapy water into the gap to loosen the internal seal between the grip and the handlebar.
- Twist the grip back and forth while slowly pulling it outward — this breaks the suction and slides it off without cutting.
- For tight MTB grips or motorcycle handlebar grips, use an air compressor nozzle to blow air under the grip and release the seal instantly.
- If the grip is especially stubborn, insert a zip tie under the rubber to help distribute lubricant and break the friction evenly.
- Once removed, clean both the handlebar surface and inside of the grip using a clean rag and isopropyl alcohol to remove residue.
- Let the components dry completely before reinstalling or replacing the grips.
5. How to Remove Handlebar Grips on a Motorcycle (Without Cutting)
- Begin by gently prying up the edge of the grip using a plastic pry tool or small flathead screwdriver, taking care not to damage the throttle tube.
- Spray a small amount of rubbing alcohol, grip glue solvent, or soapy water under the lifted edge to reduce grip adhesion.
- Twist and pull the grip gradually while applying more lubricant as needed to work it off the bar.
- For tight-fitting grips, use an air compressor with a narrow nozzle to blow air under the grip, instantly breaking the seal.
- Avoid sharp tools or metal objects that could scratch or gouge the handlebars or damage Renthal lock-on grips.
- If the grips are glued on, patience and repeated lubrication will help avoid tearing the rubber.
- Clean both the grip interior and handlebar surface thoroughly before reinstalling or replacing with new grips.
- This technique works well on both standard grips and half waffle-style grips commonly used on dirt and street bikes.
6. Installing New Grips the Right Way
- Clean the handlebar thoroughly with isopropyl alcohol to remove old adhesive, dirt, or grease before installing new grips.
- For motorcycle grips without glue, apply a small amount of rubbing alcohol or hairspray inside the grip to act as a temporary lubricant and bonding agent.
- Slide the grip onto the handlebar quickly before the lubricant dries; ensure it’s aligned properly with throttle or clutch components.
- If using Renthal lock-on grips or other locking models, align the grip with control levers, then tighten the locking rings using a torque wrench to manufacturer specs.
- Avoid using strong adhesives like super glue that may damage the rubber or make future removal difficult.
- After installation, allow the grips to set for several hours or until fully dry before riding to ensure a secure fit.
- Recheck grip alignment and throttle movement (if applicable) to confirm smooth operation without resistance.
- Installing grips properly improves control, reduces hand fatigue, and extends grip lifespan—especially on dirt bikes or motorcycles.
7. Popular Grip Types That Are Easy to Remove and Reinstall
- Lock-on grips: These grips, like Renthal lock-on grips, use built-in clamps and are secured with bolts, making removal and reinstallation fast and tool-friendly.
- Slide-on rubber grips: Common on MTB handlebars and some motorcycles; these can be removed easily using soapy water or compressed air and reused with proper care.
- Half waffle grips: Popular among dirt bike riders for added traction; they can be installed with or without glue and are relatively easy to replace.
- Foam grips: Lightweight and shock-absorbing, foam grips are usually easy to slide off with rubbing alcohol and reinstall using the same method.
- Ergonomic grips with locking ends: Ideal for comfort-focused riders, these offer a tool-free installation and are easy to reposition or swap out.
- Vintage motorcycle grips: Often use a slide-on design and can be removed with patience and lubricant, then reinstalled without damage if properly maintained.
- Choosing removable grip styles saves time during upgrades and makes how to remove bike grips without cutting a far easier process.
8. Common Mistakes to Avoid During Grip Removal
- Pulling grips off forcefully without lubrication can cause tearing, especially with foam or rubber types.
- Using a sharp tool without care may scratch or damage the handlebars, making reinstallation difficult.
- Skipping the use of rubbing alcohol, compressed air, or soapy water often leads to excessive force or broken grips.
- Failing to loosen bar-end plugs or lock rings on lock-on grips may prevent proper removal and damage the hardware.
- Ignoring throttle tube alignment during motorcycle grip removal can lead to misalignment and unsafe operation.
- Putting worn-out or unclean grips back on your handlebars can lead to a loose fit, reducing your control and safety while riding.
- Overlooking whether the grips match your handlebar’s diameter often leads to an improper fit and faster wear over time.
- Rushing the process without proper tools (like a flathead screwdriver, air compressor, or alcohol sprayer) can damage both grips and bars.
- Using glue for non-glue grips during reinstallation makes future grip replacement difficult and often ruins the grips.
9. Conclusion
Mastering how to remove bike grips without cutting is not only cost-effective but also helps you extend the life of your existing grips—whether you’re working on a mountain bike, dirt bike, or motorcycle. By using simple tools like rubbing alcohol or compressed air and following the right removal techniques, you can avoid unnecessary damage and reinstall your grips with ease.
Whether you’re learning how to remove MTB grips, upgrading to Renthal lock-on grips, or replacing worn-out motorcycle handles, taking the time to do it right improves safety, comfort, and control on every ride. With the right care and method, your handlebar setup can stay secure and ride-ready for miles to come.
10. FAQs
Q1: What is the easiest way to remove bike grips without cutting them?
The easiest method is to spray rubbing alcohol or soapy water under the grip using a thin screwdriver or zip tie.
Q2: Can I reuse old bike grips after removing them?
Yes, if the grips are still in good shape—not stretched, torn, or cracked—you can definitely reuse them. Just clean them properly before reinstalling.
Q3: How do I remove MTB grips that are stuck?
Use compressed air or spray a lubricant like isopropyl alcohol under the grip. Wiggle the grip to loosen it gradually. This works well for mountain bike grips and Renthal half waffle grips.
Q4: Is it safe to remove motorcycle grips without cutting them?
Yes, especially if you’re planning to install motorcycle grips without glue. Warm the grip slightly with a hair dryer, use a blunt object to lift an edge, and apply lubricant to ease removal.
Q5: What should I avoid when removing handlebar grips?
Avoid sharp tools that can tear or damage the grip or bar. Don’t force the grip off if it’s stuck—use air or liquid to loosen it safely.
Q6: Can I install new grips without using glue?
Absolutely. Lock-on grips or grips with built-in clamps don’t require glue. For traditional grips, rubbing alcohol works well as a lubricant and dries quickly for a firm hold.